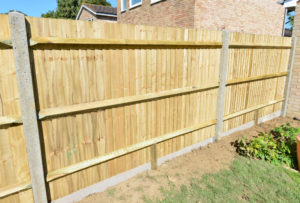
Installing Closeboard Fencing
Closeboard fencing is one of the most common types of fences you’ll find across UK gardens. Normally using concrete posts or wooden posts, cant rails and then arranging the boards in a feathered look. It really offers a great, tidy finish. While simultaneously offering protection, security and privacy.

To install your standard closeboard fencing panels – using posts, cant rails and boards – follow these steps:
- Before carrying out the installation check to see you have the right equipment. This includes post hole diggers, spades, post mix and a tape measure. You should also have safety equipment like gloves, boots and mask/goggles. You should also check the fence is yours to take down and be aware of any property plan boundaries and planning permission laws.
- There are two ways to install fence posts – you can secure posts into the ground using concrete or fence spikes. Or if you need to put your fence over a patio or other hard ground – use metal post supports which sit on top of concrete and are bolted down. Concreting posts into the ground is the strongest and most durable solution that many people use.
- Dig the first hole for your fence post to the depth and diameter needed for your fence size. Posts should be 0.6m longer than your fence.
- Clear the ground of any objects or rocks. Measure and mark out exactly where you want your fence to go.
- Dig a 0.6m hole for your first post and fill the hole with 5cm of gravel or ballast for drainage. Once level, insert your post on top.
- Once this post is in place and level, half fill the hole with water and pour in the post set mix evenly until at soil level. Wear safety equipment during this process.
- Before the post set hardens, make sure the post is still level. Once set cover the top of the hole with soil or grass.
- Next, install your gravel board – either a concrete gravel board or a timber gravel board. Nail the cleat to your timber fence post at a 22-25mm depth from the face of your post. To fix the fence posts and keep them level, gravel boards can be bedded into concrete.
- To attach the fence panel to your wooden fence post you can either nail it directly to the post or measure out and attach using L-Brackets to the fence post. It is sensible to secure both front and back sides or each fence panel to the post for a strong fence to withstand windy weather conditions.
- The final step is to nail/slot in between L-brackets and secure your fence panels into place. Simply slot each close board panel between the L-brackets, on top of your gravel boards. Ensure you secure the fence panel to the L-bracket or windy weather will cause panels to move and bang in the wind.
- Ensure you work in the following order – post, gravel board, fence panel, post. This with prevent you from any mismeasurements and having to remove posts if you put all your posts in first then found the gap for your fence panel to be placed in is too wide or not wide enough.
- Add any further trims or additions to your fence as desired or needed.
We hope that gives you a good guide to follow. At Clarke Fencing we have a range of fencing and timber products that are perfect for any home or commercial project. To find out more about what we offer visit our online store or speak with our friendly expert team by visiting us in our Stowmarket shop or by phone on 01449 614 939. For the best fencing supplies contact Clarke fencing today!
